Android进程间通信总结

  • Android进程间通用常见方式:
1
2
3
4
5
6
 Bundle:四大组件间通信, 通过intent放入Bundle数据 intent.putExtras(bundle),但是只能单向的而且是常用基本数据。
File:文件共享 ,但是涉及多线程读写问题
ContentProvider:应用间数据共享(基于 Binder)
AIDL:Binder机制(基于 Binder)
Messager:基于AIDL、Handler实现 (基于 Binder)
Socket:建立C/S通信模型
  • 这里面有个类Binder, 他是AIDL、Messager的基础,是实现跨进程通信的核心

Binder常见的使用地方

  • binder用在绑定服务的地方,从官网的文档里可以看到,常用的3个方式。https://developer.android.com/guide/components/bound-services#Binder
  • 本应用内与service交互获取数据:过扩展 Binder 类并从 onBind() 返回该类的实例来创建接口。收到 Binder 后,客户端可利用其直接访问 Binder 实现或 Service 中可用的公共方法。
  • 跨进程的交互使用Messenger(底层只是对Binder的简单包装),使用 Messenger 为服务提供接口。借助此方法,您无需使用 AIDL 便可执行进程间通信 (IPC),封装的单线程AIDL。
  • 跨进程AIDL:Messenger 会在单个线程中创建包含所有客户端请求的队列,以便服务一次接收一个请求。不过,如果想让服务同时处理多个请求,则可直接使用 AIDL

同一进程内与service使用 ,且无需跨进程工作 Binder使用

  • 则您可以实现自有 Binder 类,让客户端通过该类直接访问服务中的公共方法。
  • service里,实现onBind方法,通过IBinder,提供客户端进行访问的实例,客户端通过IBinder ,拿到service的实例,即能拿到service的相关方法访问
1
2
3
4
5
6
7
8
9
10
11
12
13
14
15
16
17
public class MyService extends Service {
private final Binder mBinder = new MyBinder();
private final Random mGenerator = new Random();
@Nullable
@Override
public IBinder onBind(Intent intent) {
return mBinder;
}
public class MyBinder extends Binder {
public MyService getService() {
return MyService.this;
}
}
public int getNextNumber() {
return mGenerator.nextInt(100);
}
}
  • 使用者的代码: 通过bindService后在connection里获取到 IBinder ,通过Binder那到services,继而访问对应的方法。
1
2
3
4
5
6
7
8
9
10
11
12
13
14
15
16
17
18
19
20
21
22
23
24
25
26
27
28
29
30
31
32
33
34
35
36
37
38
39
40
41
42
43
44
45
46
public class MainActivity extends AppCompatActivity {
private MyService mService;
private boolean binded = false;

@Override
protected void onCreate(Bundle savedInstanceState) {
super.onCreate(savedInstanceState);
setContentView(R.layout.activity_main);
}

@Override
protected void onStart() {
super.onStart();
Intent intent = new Intent(this, MyService.class);
bindService(intent, connection, Context.BIND_AUTO_CREATE);
}


ServiceConnection connection = new ServiceConnection() {
@Override
public void onServiceConnected(ComponentName name, IBinder service) {
MyService.MyBinder binder = (MyService.MyBinder) service;
mService = binder.getService();
binded = true;
}

@Override
public void onServiceDisconnected(ComponentName name) {
binded = false;
}
};


@Override
protected void onStop() {
super.onStop();
unbindService(connection);
}

public void myButton(View view) {
if (binded) {
int data = mService.getNextNumber();
Toast.makeText(this, data+"", Toast.LENGTH_SHORT).show();
}
}
}

AIDL的使用(底层使用Binder)跨进程通信方式

  • 创建AIDL文件,使用studio在src目录创建后,rebuild工程后,会在gen目录下生产IBinder 接口文件,生成文件的名称与 .aidl 文件的名称保持一致,区别在于其使用 .java 扩展名(IRemoteService.aidl 生成的文件名是 IRemoteService.java)
1
2
3
4
5
6
7
8
interface IRemoteService {
/**
* Demonstrates some basic types that you can use as parameters
* and return values in AIDL.
*/
void basicTypes(int anInt, long aLong, boolean aBoolean, float aFloat,
double aDouble, String aString);
}
  • Android SDK 工具会生成以 .aidl 文件命名的 .java 接口文件。生成的接口包含一个名为 Stub 的子类(例如,YourInterface.Stub),该子类是其父接口的抽象实现,并且会声明 .aidl 文件中的所有方法。
  • 暴露在使用的services里进行实现 IRemoteService.Stub(),供客户端进行使用
1
2
3
4
5
6
7
8
9
10
11
12
13
14
15
16
17
18
19
20
21
22
public class RemoteService extends Service {
@Override
public void onCreate() {
super.onCreate();
}

@Override
public IBinder onBind(Intent intent) {
// Return the interface
return binder;
}

private final IRemoteService.Stub binder = new IRemoteService.Stub() {
public int getPid(){
return Process.myPid();
}
public void basicTypes(int anInt, long aLong, boolean aBoolean,
float aFloat, double aDouble, String aString) {
// Does nothing
}
};
}
  • 当客户端(如 Activity)调用 bindService() 以连接此服务时,客户端的 onServiceConnected() 回调会接收服务的 onBind() 方法所返回的 binder 实例。

  • 当客户端在 onServiceConnected() 回调中收到 IBinder 时,它必须调用 YourServiceInterface.Stub.asInterface(service),以将返回的参数转换成 YourServiceInterface 类型。

1
2
3
4
5
6
7
8
9
10
11
12
13
14
15
IRemoteService iRemoteService;
private ServiceConnection mConnection = new ServiceConnection() {
// Called when the connection with the service is established
public void onServiceConnected(ComponentName className, IBinder service) {
// Following the example above for an AIDL interface,
// this gets an instance of the IRemoteInterface, which we can use to call on the service
iRemoteService = IRemoteService.Stub.asInterface(service);
}

// Called when the connection with the service disconnects unexpectedly
public void onServiceDisconnected(ComponentName className) {
Log.e(TAG, "Service has unexpectedly disconnected");
iRemoteService = null;
}
};
  • AIDL传递对象时需要注意,跨进程通过bundle传递对象时,如果bundle中存放了parcelable对象需要手动设置setClassLoader,因为默认情况下bundle传输使用的ClassLoader是BootClassLoader,而BootClassLoader只能加载系统类,我们本工程的class需要使用PathClassLoader进行加载,因此需要额外的调用bundle的setClassLoader方法设置类加载器
1
2
3
4
5
6
7
private final IRectInsideBundle.Stub binder = new IRectInsideBundle.Stub() {
public void saveRect(Bundle bundle){
bundle.setClassLoader(getClass().getClassLoader());
Rect rect = bundle.getParcelable("rect");
process(rect); // Do more with the parcelable.
}
};
  • 如要调用通过 AIDL 定义的远程接口,调用类必须执行以下步骤:
1
2
3
4
5
6
7
1. 在项目的 src/ 目录中加入 .aidl 文件。
2. 声明一个 IBinder 接口实例(基于 AIDL 生成),一般在RemoteService里实现
3. 实现 ServiceConnection。
4. 调用 Context.bindService(),从而传入您的 ServiceConnection 实现。(客户端使用)
5. 在 onServiceConnected() 实现中,您将收到一个 IBinder 实例(名为 service)。调用 YourInterfaceName.Stub.asInterface((IBinder)service),以将返回的参数转换为 YourInterface 类型。
6. 调用您在接口上定义的方法。您应始终捕获 DeadObjectException 异常,系统会在连接中断时抛出此异常。您还应捕获 SecurityException 异常,当 IPC 方法调用中两个进程的 AIDL 定义发生冲突时,系统会抛出此异常。
7. 如要断开连接,请使用您的接口实例调用 Context.unbindService()。

使用 Messenger

  • 让服务与远程进程通信,则可使用 Messenger 为您的服务提供接口。借助此方法,您无需使用 AIDL 便可执行进程间通信 (IPC)。(官方摘录)

  • 对于大多数应用,服务无需执行多线程处理,因此使用 Messenger 即可让服务一次处理一个调用。如果您的服务必须执行多线程处理,请使用 AIDL 来定义接口。

  • 相对AIDL来说,Messenger的使用是很简单了,省去中间很多繁琐的操作,对AIDL进行了封装,也就是对 Binder 的封装

  • 使用步骤:

1
2
3
4
5
6
服务实现一个 Handler,由该类为每个客户端调用接收回调。
服务使用 Handler 来创建 Messenger 对象(对 Handler 的引用)。
Messenger 创建一个 IBinder,服务通过 onBind() 使其返回客户端。
客户端使用 IBinder 将 Messenger(其引用服务的 Handler)实例化,然后使用后者将 Message 对象发送给服务。
服务在其 Handler 中(具体地讲,是在 handleMessage() 方法中)接收每个 Message。
这样,客户端便没有方法来调用服务。相反,客户端会传递服务在其 Handler 中接收的消息(Message 对象)。
  • 例子
1
2
3
4
5
6
7
8
9
10
11
12
13
14
15
16
17
18
19
20
21
22
23
24
25
26
27
28
29
30
31
32
33
34
35
36
37
38
39
40
41
42
43
44
45

public class MessengerService extends Service {
/**
* Command to the service to display a message
*/
static final int MSG_SAY_HELLO = 1;

/**
* Handler of incoming messages from clients.
*/
static class IncomingHandler extends Handler {
private Context applicationContext;

IncomingHandler(Context context) {
applicationContext = context.getApplicationContext();
}

@Override
public void handleMessage(Message msg) {
switch (msg.what) {
case MSG_SAY_HELLO:
Toast.makeText(applicationContext, "hello!", Toast.LENGTH_SHORT).show();
break;
default:
super.handleMessage(msg);
}
}
}

/**
* Target we publish for clients to send messages to IncomingHandler.
*/
Messenger mMessenger;

/**
* When binding to the service, we return an interface to our messenger
* for sending messages to the service.
*/
@Override
public IBinder onBind(Intent intent) {
Toast.makeText(getApplicationContext(), "binding", Toast.LENGTH_SHORT).show();
mMessenger = new Messenger(new IncomingHandler(this));
return mMessenger.getBinder();
}
}
  • 客户端只需根据服务返回的 IBinder 创建 Messenger,然后利用 send() 发送消息。例如,以下简单 Activity 展示如何绑定到服务并向服务传递 MSG_SAY_HELLO 消息:
1
2
3
4
5
6
7
8
9
10
11
12
13
14
15
16
17
18
19
20
21
22
23
24
25
26
27
28
29
30
31
32
33
34
35
36
37
38
39
40
41
42
43
44
45
46
47
48
49
50
51
52
53
54
55
56
57
58
59
60
61
62
63
64
public class ActivityMessenger extends Activity {
/** Messenger for communicating with the service. */
Messenger mService = null;

/** Flag indicating whether we have called bind on the service. */
boolean bound;

/**
* Class for interacting with the main interface of the service.
*/
private ServiceConnection mConnection = new ServiceConnection() {
public void onServiceConnected(ComponentName className, IBinder service) {
// This is called when the connection with the service has been
// established, giving us the object we can use to
// interact with the service. We are communicating with the
// service using a Messenger, so here we get a client-side
// representation of that from the raw IBinder object.
mService = new Messenger(service);
bound = true;
}

public void onServiceDisconnected(ComponentName className) {
// This is called when the connection with the service has been
// unexpectedly disconnected -- that is, its process crashed.
mService = null;
bound = false;
}
};

public void sayHello(View v) {
if (!bound) return;
// Create and send a message to the service, using a supported 'what' value
Message msg = Message.obtain(null, MessengerService.MSG_SAY_HELLO, 0, 0);
try {
mService.send(msg);
} catch (RemoteException e) {
e.printStackTrace();
}
}

@Override
protected void onCreate(Bundle savedInstanceState) {
super.onCreate(savedInstanceState);
setContentView(R.layout.main);
}

@Override
protected void onStart() {
super.onStart();
// Bind to the service
bindService(new Intent(this, MessengerService.class), mConnection,
Context.BIND_AUTO_CREATE);
}

@Override
protected void onStop() {
super.onStop();
// Unbind from the service
if (bound) {
unbindService(mConnection);
bound = false;
}
}
}
  • 服务端如果需要通过接收到消息,在给客户端恢复,可利用message里的 replyTo 引用,保存Messenger对象,通过改对象的send到达回复消息。
  • Messenger的源码可以看到,通过构造时传入的Handler , 通过target.getIMessenger() ,可以看到MessengerImpl的接口定义是AIDL的实现,底层也是AIDL,而AIDL的底层又是通过Binder
1
2
3
public Messenger(Handler target) {
mTarget = target.getIMessenger();
}
1
2
3
4
5
6
7
8
9
10
11
12
13
14
15
16
17
@UnsupportedAppUsage
final IMessenger getIMessenger() {
synchronized (mQueue) {
if (mMessenger != null) {
return mMessenger;
}
mMessenger = new MessengerImpl();
return mMessenger;
}
}

private final class MessengerImpl extends IMessenger.Stub {
public void send(Message msg) {
msg.sendingUid = Binder.getCallingUid();
Handler.this.sendMessage(msg);
}
}

Binder

  • Binder 是一种进程间通信机制,基于开源的 OpenBinder实现
  • Binder是Android提供的一套进程间通信框架。系统服务ActivityManagerService,LocationManagerService,等都是在单独进程中的,使用binder和应用进行通信。
  • 因为整个Android系统分成三层。最上层是application应用层,第二层是Framework层,第三层是native层。
1
2
Android中的应用层和系统服务层不在同一个进程,系统服务在单独的进程中。
Android中不同应用属于不同的进程中。
  • Android应用和系统services运行在不同进程中是为了安全,稳定,以及内存管理的原因,但是应用和系统服务需要通信和分享数据。这里面靠的就是Binder机制。一个进程是不能直接直接操作另一个进程的,比如说读取另一个进程的数据,或者往另一个进程的内存空间写数据,进程之间的通信要通过内核进程才可以。
  • IPC全名为inter-Process Communication,含义为进程间通信, Binder是android实现的进程间通信的一种方式。

Linux和Binder的各自的IPC通信原理

  • 几个主要概念:

  • 1,内核空间和用户空间:

1
User space(用户空间)和 Kernel space(内核空间)。内核空间是Linux内核的运行空间,用户空间是用户程序的运行空间。为了保护用户进程不能直接操作内核,保证内核的安全,操作系统从逻辑上将虚拟空间划分为用户空间和内核空间。Linux 操作系统将最高的1GB字节供内核使用,称为内核空间,较低的3GB 字节供各进程使用,称为用户空间。(32位操作系统) 2的32次方, 除以3个1024得到4G,(https://www.pianshen.com/article/19121897068/),一个地址就是内存中最小存储单位一个字节,估为4G。
  • 2,系统调用:
1
2
3
4
5
用户空间需要访问内核空间,就需要借助系统调用来实现。系统调用是用户空间访问内核空间的唯一方式,保证了所有的资源访问都是在内核的控制下进行的,避免了用户程序对系统资源的越权访问,提升了系统安全性和稳定性。

进程A和进程B的用户空间可以通过如下系统函数和内核空间进行交互。
copy_from_user:将用户空间的数据拷贝到内核空间。
copy_to_user:将内核空间的数据拷贝到用户空间。
  • 3,内存映射:
1
2
3
 由于应用程序不能直接操作设备硬件地址,所以操作系统提供了一种机制:内存映射,把设备地址映射到进程虚拟内存区。
举个例子,如果用户空间需要读取磁盘的文件,如果不采用内存映射,那么就需要在内核空间建立一个页缓存,页缓存去拷贝磁盘上的文件,然后用户空间拷贝页缓存的文件,这就需要两次拷贝。由于新建了虚拟内存区域,那么磁盘文件和虚拟内存区域就可以直接映射,少了一次拷贝。
内存映射全名为Memory Map,在Linux中通过系统调用函数mmap来实现内存映射。将用户空间的一块内存区域映射到内核空间。映射关系建立后,用户对这块内存区域的修改可以直接反应到内核空间,反之亦然。内存映射能减少数据拷贝次数,实现用户空间和内核空间的高效互动

Linux的IPC通信原理

  • 内核程序在内核空间分配内存并开辟一块内核缓存区,发送进程通过copy_from_user函数将数据拷贝到到内核空间的缓冲区中。同样的,接收进程在接收数据时在自己的用户空间开辟一块内存缓存区,然后内核程序调用 copy_to_user() 函数将数据从内核缓存区拷贝到接收进程。这样数据发送进程和数据接收进程完成了一次数据传输,也就是一次进程间通信。
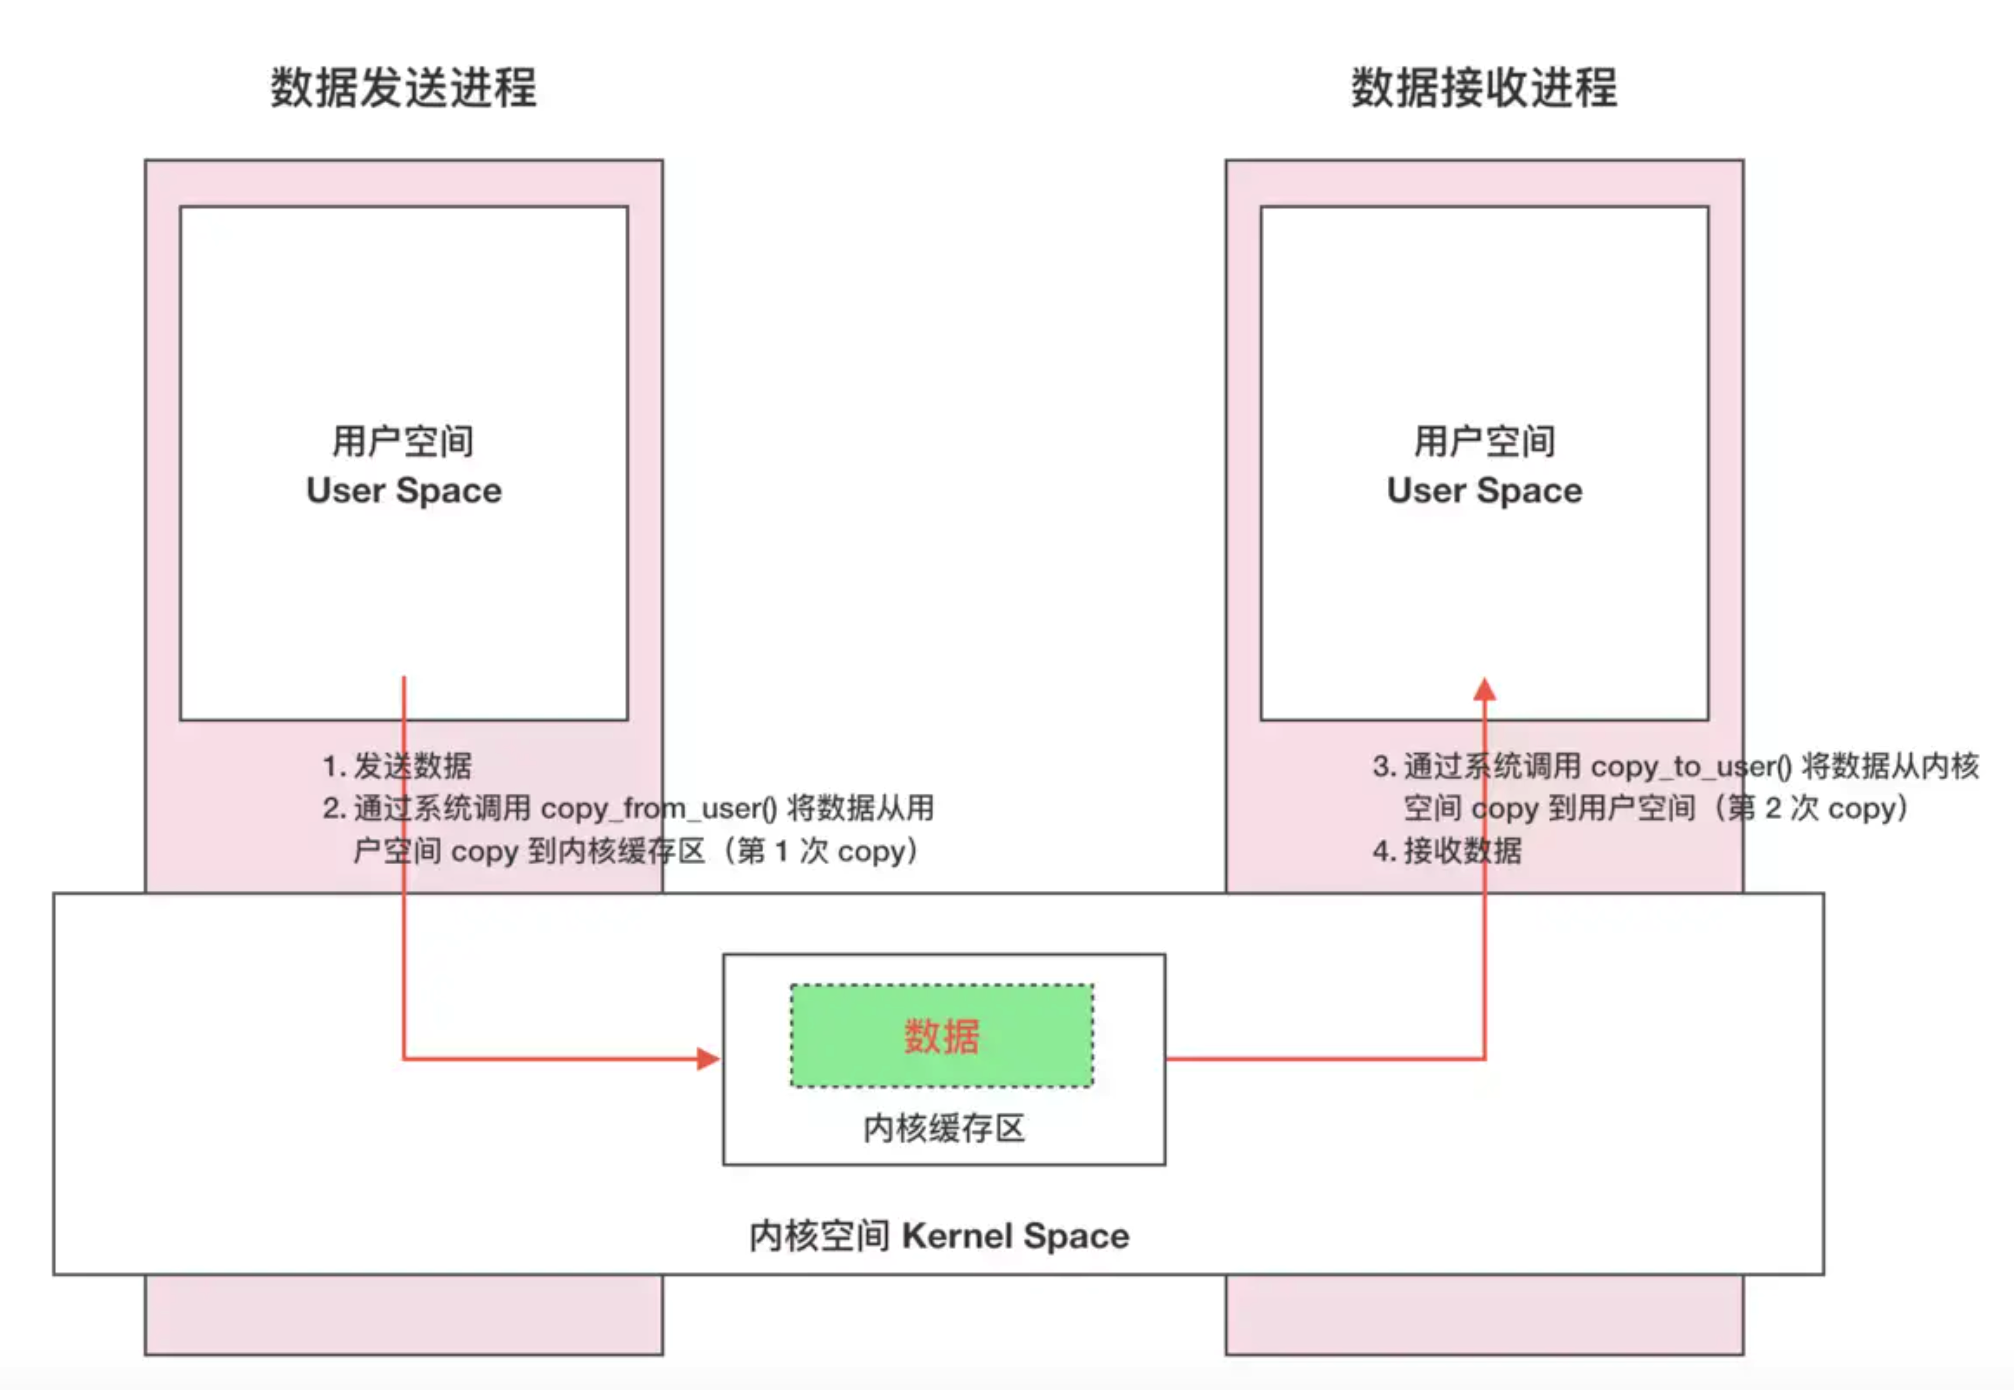
  • Linux的IPC通信原理有两个问题:
1
2
一次数据传递需要经历:用户空间 --> 内核缓存区 --> 用户空间,需要2次数据拷贝,这样效率不高。
接收数据的缓存区由数据接收进程提供,但是接收进程并不知道需要多大的空间来存放将要传递过来的数据,因此只能开辟尽可能大的内存空间或者先调用API接收消息头来获取消息体的大小,浪费了空间或者时间。

2.2 Binder的通信原理

  • Binder是基于内存映射来实现的,Binder通信的步骤如下:
1
2
3
4
Binder驱动在内核空间创建一个数据接收缓存区。
在内核空间开辟一块内核缓存区,建立内核缓存区和数据接收缓存区之间的映射关系,以及数据接收缓存区和接收进程用户空间地址的映射关系。
发送方进程通过copy_from_user()函数将数据拷贝 到内核中的内核缓存区,由于内核缓存区和接收进程的用户空间存在内存映射,因此也就相当于把数据发送到了接收进程的用户空间,这样便完成了一次进程间的通信。
整个过程只使用了1次拷贝,不会因为不知道数据的大小而浪费空间或者时间,效率更高。

  • 一次完整的 Binder IPC 通信过程通常是这样:(如上图)
1
2
3
首先 Binder 驱动在内核空间创建一个数据接收缓存区;
接着在内核空间开辟一块内核缓存区,建立内核缓存区和内核中数据接收缓存区之间的映射关系,以及内核中数据接收缓存区和接收进程用户空间地址的映射关系;
发送方进程通过系统调用 copyfromuser() 将数据 copy 到内核中的内核缓存区,由于内核缓存区和接收进程的用户空间存在内存映射,因此也就相当于把数据发送到了接收进程的用户空间,这样便完成了一次进程间的通信。

Binder机制优点:

1
2
3
1、只需要进行一次数据拷贝,性能上仅次于共享内存
2、基于C/S架构,职责明确,架构清晰,稳定性较好
3、为每个App分配UID,UID是鉴别进程身份的标志,安全性较好