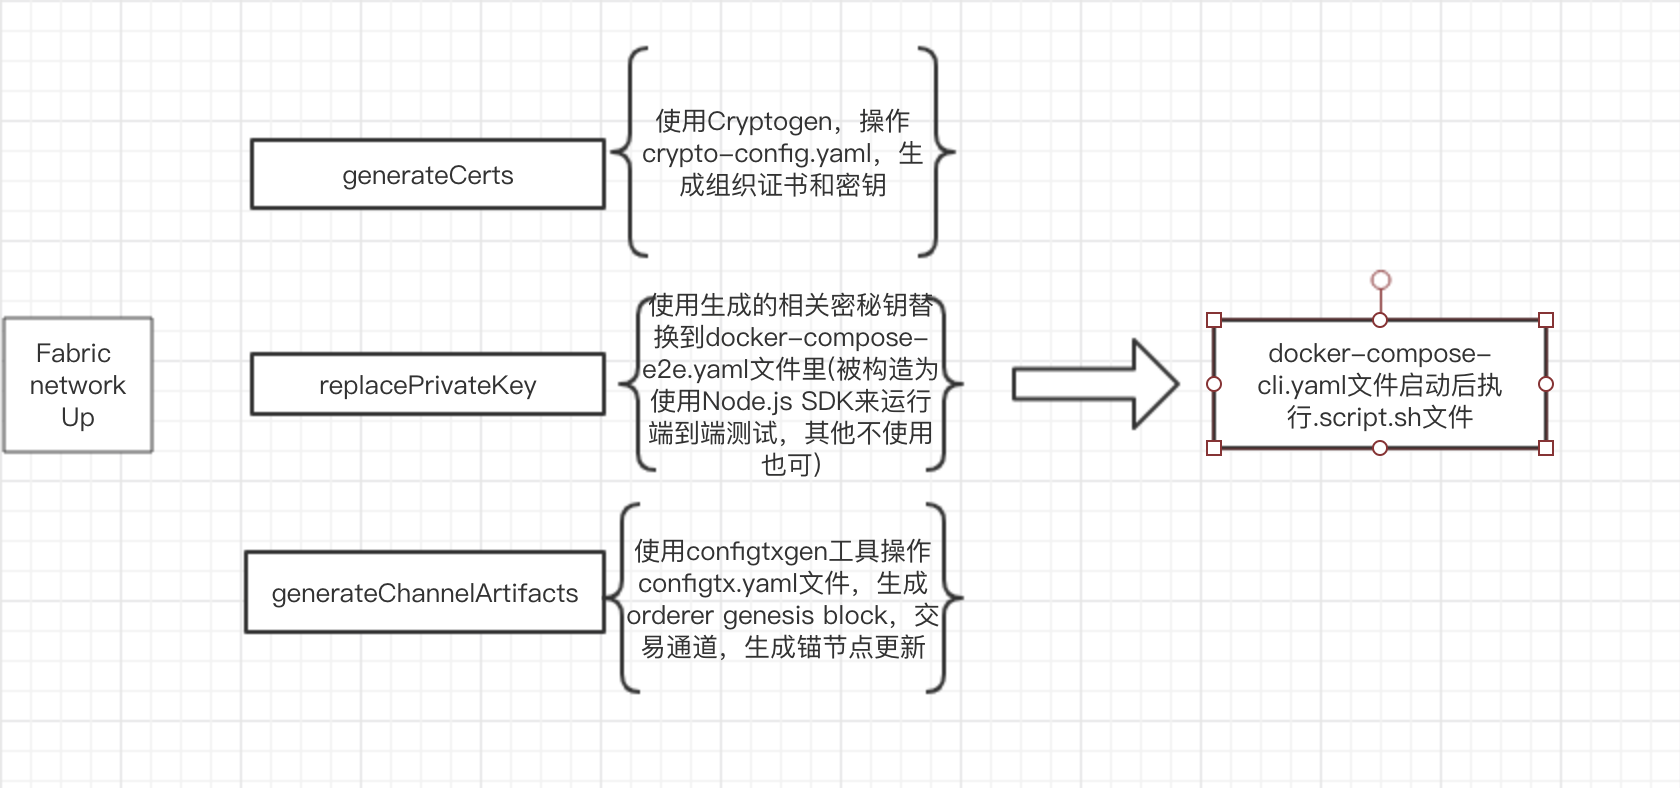
Fabric网络启动流程-分步分析

farbic 网络启动过程

  • 基于fabric-samples/first-network下手动网络启动相关文件生成和配置。

生成组织关系和身份证书

  • 使用Cryptogen,消费一个包含网络拓扑的crypto-config.yaml,并允许我们为组织和属于这些组织的组件生成一组证书和密钥。
  • crypto-config.yaml文件内容如下,
1
2
3
4
5
6
7
8
9
10
11
12
13
14
15
16
17
18
19
20
21
22
23
24
25
26
27
28
29
30
31
32
33
34
35
36
37
38
39
40
41
42
43
44
45
46
47
48
49
50
51
52
53
54
55
56
57
58
59
60
61
62
63
64
65
66
67
68
69
70
71
72
73
OrdererOrgs:
# ---------------------------------------------------------------------------
# Orderer
# ---------------------------------------------------------------------------
- Name: Orderer
Domain: example.com
# ---------------------------------------------------------------------------
# "Specs" - See PeerOrgs below for complete description
# ---------------------------------------------------------------------------
Specs:
- Hostname: orderer
# ---------------------------------------------------------------------------
# "PeerOrgs" - Definition of organizations managing peer nodes
# ---------------------------------------------------------------------------
PeerOrgs:
# ---------------------------------------------------------------------------
# Org1
# ---------------------------------------------------------------------------
- Name: Org1
Domain: org1.example.com
# ---------------------------------------------------------------------------
# "Specs"
# ---------------------------------------------------------------------------
# Uncomment this section to enable the explicit definition of hosts in your
# configuration. Most users will want to use Template, below
#
# Specs is an array of Spec entries. Each Spec entry consists of two fields:
# - Hostname: (Required) The desired hostname, sans the domain.
# - CommonName: (Optional) Specifies the template or explicit override for
# the CN. By default, this is the template:
#
# "{{.Hostname}}.{{.Domain}}"
#
# which obtains its values from the Spec.Hostname and
# Org.Domain, respectively.
# ---------------------------------------------------------------------------
# Specs:
# - Hostname: foo # implicitly "foo.org1.example.com"
# CommonName: foo27.org5.example.com # overrides Hostname-based FQDN set above
# - Hostname: bar
# - Hostname: baz
# ---------------------------------------------------------------------------
# "Template"
# ---------------------------------------------------------------------------
# Allows for the definition of 1 or more hosts that are created sequentially
# from a template. By default, this looks like "peer%d" from 0 to Count-1.
# You may override the number of nodes (Count), the starting index (Start)
# or the template used to construct the name (Hostname).
#
# Note: Template and Specs are not mutually exclusive. You may define both
# sections and the aggregate nodes will be created for you. Take care with
# name collisions
# ---------------------------------------------------------------------------
Template:
Count: 2
# Start: 5
# Hostname: {{.Prefix}}{{.Index}} # default
# ---------------------------------------------------------------------------
# "Users"
# ---------------------------------------------------------------------------
# Count: The number of user accounts _in addition_ to Admin
# ---------------------------------------------------------------------------
Users:
Count: 1
# ---------------------------------------------------------------------------
# Org2: See "Org1" for full specification
# ---------------------------------------------------------------------------
- Name: Org2
Domain: org2.example.com
Template:
Count: 2
Users:
Count: 1
  • 在这个文件里有一个count变量。我们将使用它来指定每个组织中peer的数量;例子中,每个组织有两个peer
  • 我们运行cryptogen工具,生成的证书和密钥将被保存到名为crypto-config的文件夹中。(cryptogen需要配置在环境变量才能这么用)
1
2
3
cryptogen generate  --config=./crypto-config.yaml
org1.example.com
org2.example.com
  • 其中里面生成额对应的秘钥和证书文件
1
2
3
4
5
6
7
8
9
10
11
12
13
14
15
16
17
18
19
20
21
22
23
24
25
26
27
28
29
30
31
32
33
34
35
36
37
38
39
40
41
42
43
44
45
46
47
48
49
50
51
├── ordererOrganizations
│   └── example.com
│   ├── ca
│   │   ├── ca.example.com-cert.pem
│   │   └── feb74b240fa3568a7d6966b7021cd5a7f186a1d91bece747844e27a8540dc465_sk
│   ├── msp
│   │   ├── admincerts
│   │   ├── cacerts
│   │   └── tlscacerts
│   ├── orderers
│   │   └── orderer.example.com
│   ├── tlsca
│   │   ├── e5622d48e5fd8e3b982d6e7f6ebed20321f1de0d1478f9d0c1b4f63dc894ccbf_sk
│   │   └── tlsca.example.com-cert.pem
│   └── users
│   └── Admin@example.com
└── peerOrganizations
├── org1.example.com
│   ├── ca
│   │   ├── ca.org1.example.com-cert.pem
│   │   └── f5c0954e487ff4e71f77478db2ad2e14c92ffd0b5d093a1c73b64ae233a2813f_sk
│   ├── msp
│   │   ├── admincerts
│   │   ├── cacerts
│   │   └── tlscacerts
│   ├── peers
│   │   ├── peer0.org1.example.com
│   │   └── peer1.org1.example.com
│   ├── tlsca
│   │   ├── 8d07c6968bea26c1277c5cf3bba114bf7c683e97bafc8eadf412fd97d5034cad_sk
│   │   └── tlsca.org1.example.com-cert.pem
│   └── users
│   ├── Admin@org1.example.com
│   └── User1@org1.example.com
└── org2.example.com
├── ca
│   ├── ca.org2.example.com-cert.pem
│   └── cffd49870ddd4088820ee7787c60f77ee07c42f2e05ac0e9fe94fac77c972fc1_sk
├── msp
│   ├── admincerts
│   ├── cacerts
│   └── tlscacerts
├── peers
│   ├── peer0.org2.example.com
│   └── peer1.org2.example.com
├── tlsca
│   ├── 5f3f535f85bd861c1f7770f058f05e4a899506b5396ebd357db223b4590b49ba_sk
│   └── tlsca.org2.example.com-cert.pem
└── users
├── Admin@org2.example.com
└── User1@org2.example.com
  • crypto-config目录下产生一个order组织目录,和peer组织目录

    1
    2
     cd crypto-config$ls
    ordererOrganizations peerOrganizations
  • 进入后发现peerOrganizations下会有2个组织(org1.example.com ,org2.example.com),4个节点(peer0.org1.example.com,peer1.org1.example.com, peer0.org2.example.com ,peer1.org2.example.com)

ordering服务启动初始区块

  • orderer节点在启动时候,可以指定使用提前生成的初始化区块文件作为系统通道的初始配置,初始区块中包含了ordering服务配置信息和联盟信息。
  • 初始区块使用configtxgen工具生成,依赖configtx.yaml文件,这个文件定义了整个网络中相关配置和拓扑结构信息。(first-network下的这个文件)
1
2
3
4
5
6
7
8
9
10
11
12
13
14
15
16
17
18
19
20
21
22
23
24
25
26
27
28
29
30
31
32
33
34
35
36
37
38
39
40
41
42
43
44
45
46
47
48
49
50
51
52
53
54
55
56
57
58
59
60
61
62
63
64
65
66
67
68
69
70
71
72
73
74
75
76
77
78
79
80
81
82
83
84
85
86
87
88
89
90
91
92
93
94
95
96
97
98
99
100
101
102
103
104
105
106
107
108
109
110
111
112
113
114
115
116
117
118
119
120
121
122
123
124
125
126
127
128
129
130
131
132
133
134
135
136
137
138
139
140
141
142
143
144
145
146
147
148
149
# Copyright IBM Corp. All Rights Reserved.
#
# SPDX-License-Identifier: Apache-2.0
#

---
################################################################################
#
# Profile
#
# - Different configuration profiles may be encoded here to be specified
# as parameters to the configtxgen tool
#
################################################################################
Profiles:

TwoOrgsOrdererGenesis:
Orderer:
<<: *OrdererDefaults
Organizations:
- *OrdererOrg
Consortiums:
SampleConsortium:
Organizations:
- *Org1
- *Org2
TwoOrgsChannel:
Consortium: SampleConsortium
Application:
<<: *ApplicationDefaults
Organizations:
- *Org1
- *Org2

################################################################################
#
# Section: Organizations
#
# - This section defines the different organizational identities which will
# be referenced later in the configuration.
#
################################################################################
Organizations:

# SampleOrg defines an MSP using the sampleconfig. It should never be used
# in production but may be used as a template for other definitions
- &OrdererOrg
# DefaultOrg defines the organization which is used in the sampleconfig
# of the fabric.git development environment
Name: OrdererOrg

# ID to load the MSP definition as
ID: OrdererMSP

# MSPDir is the filesystem path which contains the MSP configuration
MSPDir: crypto-config/ordererOrganizations/example.com/msp

- &Org1
# DefaultOrg defines the organization which is used in the sampleconfig
# of the fabric.git development environment
Name: Org1MSP

# ID to load the MSP definition as
ID: Org1MSP

MSPDir: crypto-config/peerOrganizations/org1.example.com/msp

AnchorPeers:
# AnchorPeers defines the location of peers which can be used
# for cross org gossip communication. Note, this value is only
# encoded in the genesis block in the Application section context
- Host: peer0.org1.example.com
Port: 7051

- &Org2
# DefaultOrg defines the organization which is used in the sampleconfig
# of the fabric.git development environment
Name: Org2MSP

# ID to load the MSP definition as
ID: Org2MSP

MSPDir: crypto-config/peerOrganizations/org2.example.com/msp

AnchorPeers:
# AnchorPeers defines the location of peers which can be used
# for cross org gossip communication. Note, this value is only
# encoded in the genesis block in the Application section context
- Host: peer0.org2.example.com
Port: 7051

################################################################################
#
# SECTION: Orderer
#
# - This section defines the values to encode into a config transaction or
# genesis block for orderer related parameters
#
################################################################################
Orderer: &OrdererDefaults

# Orderer Type: The orderer implementation to start
# Available types are "solo" and "kafka"
OrdererType: solo

Addresses:
- orderer.example.com:7050

# Batch Timeout: The amount of time to wait before creating a batch
BatchTimeout: 2s

# Batch Size: Controls the number of messages batched into a block
BatchSize:

# Max Message Count: The maximum number of messages to permit in a batch
MaxMessageCount: 10

# Absolute Max Bytes: The absolute maximum number of bytes allowed for
# the serialized messages in a batch.
AbsoluteMaxBytes: 99 MB

# Preferred Max Bytes: The preferred maximum number of bytes allowed for
# the serialized messages in a batch. A message larger than the preferred
# max bytes will result in a batch larger than preferred max bytes.
PreferredMaxBytes: 512 KB

Kafka:
# Brokers: A list of Kafka brokers to which the orderer connects
# NOTE: Use IP:port notation
Brokers:
- 127.0.0.1:9092

# Organizations is the list of orgs which are defined as participants on
# the orderer side of the network
Organizations:

################################################################################
#
# SECTION: Application
#
# - This section defines the values to encode into a config transaction or
# genesis block for application related parameters
#
################################################################################
Application: &ApplicationDefaults

# Organizations is the list of orgs which are defined as participants on
# the application side of the network
Organizations:
  • 该模板定义了TwoOrgsOrdererGenesis 和TwoOrgsChannel , TwoOrgsOrdererGenesis用于生成ordering服务初始区块文件。
  • BatchTimeout是配置多久产生一个区块,默认是2秒。如果配置的时间过小就会产生很多空的区块,配置时间太长,则发现等待产生区块的时间太长。具体时间由交易频率和业务量决定。我们实际项目中,通常配置在30秒。
  • MaxMessageCount是配置在一个区块中允许的交易数的最大值。默认值是10。 交易数设置过小,导致区块过多,增加orderer的负担,因为要orderer要不断的打包区块,然后deliver给通道内的所有peer,这样还容易增加网络负载,引起网络拥堵。实际项目中通常配置500,不过具体还应该看业务情况,因为如果每个交易包含的数据的size如果太大,那么500个交易可能导致一个区块太大,因此需要根据实际业务需求权衡。
  • 以上2个设置谁先满足要求,即执行。
  • 我们需要设置一个环境变量来告诉configtxgen哪里去寻找configtx.yaml。然后,我们将调用configtxgen工具去创建orderer genesis block:
1
2
3
4
5
export FABRIC_CFG_PATH=$PWD
configtxgen -profile TwoOrgsOrdererGenesis -outputBlock ./channel-artifacts/genesis.block
2018-03-13 16:52:18.697 CST [common/configtx/tool] main -> INFO 001 Loading configuration
2018-03-13 16:52:18.736 CST [common/configtx/tool] doOutputBlock -> INFO 002 Generating genesis block
2018-03-13 16:52:18.739 CST [common/configtx/tool] doOutputBlock -> INFO 003 Writing genesis block
  • 在/channel-artifacts目录下看到生成的genesis.block

创建交易通道配置

  • 我们需要创建channel transaction配置。请确保替换$CHANNEL_NAME或者将CHANNEL_NAME设置为整个说明中可以使用的环境变量:
1
2
3
4
5
6
export CHANNEL_NAME=mychannel
# this file contains the definitions for our sample channel
configtxgen -profile TwoOrgsChannel -outputCreateChannelTx ./channel-artifacts/channel.tx -channelID $CHANNEL_NAME
2018-03-13 17:32:39.744 CST [common/configtx/tool] main -> INFO 001 Loading configuration
2018-03-13 17:32:39.750 CST [common/configtx/tool] doOutputChannelCreateTx -> INFO 002 Generating new channel configtx
2018-03-13 17:32:39.751 CST [common/configtx/tool] doOutputChannelCreateTx -> INFO 003 Writing new channel tx
  • 在channel-artifacts目录下看到生成的channel.tx

  • 生成锚节点配置更新文件(每个组织中第一个节点peer0作为锚节点与其他组织进行通信)

1
2
3
4
5
6
7
8
configtxgen -profile TwoOrgsChannel -outputAnchorPeersUpdate ./channel-artifacts/Org1MSPanchors.
2018-03-13 17:44:26.627 CST [common/configtx/tool] main -> INFO 001 Loading configuration
2018-03-13 17:44:26.634 CST [common/configtx/tool] doOutputAnchorPeersUpdate -> INFO 002 Generating anchor peer update
2018-03-13 17:44:26.635 CST [common/configtx/tool] doOutputAnchorPeersUpdate -> INFO 003 Writing anchor peer update
tx -channelID $CHANNEL_NAME -asOrg Org2MSPin/fabric-samples/first-network$configtxgen -profile TwoOrgsChannel -outputAnchorPeersUpdate ./channel-artifacts/Org2MSPanchors.
2018-03-13 17:44:35.236 CST [common/configtx/tool] main -> INFO 001 Loading configuration
2018-03-13 17:44:35.239 CST [common/configtx/tool] doOutputAnchorPeersUpdate -> INFO 002 Generating anchor peer update
2018-03-13 17:44:35.239 CST [common/configtx/tool] doOutputAnchorPeersUpdate -> INFO 003 Writing anchor peer update
  • channel-artifacts目录下生成了
1
Org1MSPanchors.tx	Org2MSPanchors.tx	channel.tx  genesis.block

启动网络

  • 我们将利用docker-compose-cli.yaml脚本来启动我们的区块链网络。docker-compose-cli.yaml文件利用我们之前下载的镜像,并用以前生成的genesis.block来引导orderer。

    1
    2
    3
    4
    working_dir: /opt/gopath/src/github.com/hyperledger/fabric/peer
    # command: /bin/bash -c './scripts/script.sh ${CHANNEL_NAME}; sleep $TIMEOUT'
    volumes
    如果没有注释掉docker-compose-cli.yaml里这行,该脚本将在网络启动时执行所有命令
  • 启动这个网络

1
2
3
4
5
6
7
8
$CHANNEL_NAME=$CHANNEL_NAME TIMEOUT=1000 docker-compose -f docker-compose-cli.yaml up -d
Creating peer0.org1.example.com ... done
Creating cli ... done
Creating peer0.org2.example.com ...
Creating orderer.example.com ...
Creating peer1.org2.example.com ...
Creating peer0.org1.example.com ...
Creating cli ...

创建并加入通道

  • 确保容器已经起来后,执行
1
2
3
4
5
- docker exec -it cli bash
root@0d78bb69300d:/opt/gopath/src/github.com/hyperledger/fabric/peer#
接下来执行:
export CHANNEL_NAME=mychannel
peer channel create -o orderer.example.com:7050 -c $CHANNEL_NAME -f ./channel-artifacts/channel.tx --tls $CORE_PEER_TLS_ENABLED --cafile /opt/gopath/src/github.com/hyperledger/fabric/peer/crypto/ordererOrganizations/example.com/orderers/orderer.example.com/msp/tlscacerts/tlsca.example.com-cert.pem
  • 创建成功会生成 mychannel.block
  • peer channel join -b mychannel.block 节点加入通道,这个节点是 CORE_PEER_ADDRESS=peer0.org1.example.com:7051 可以修改cli容器里的地址进行让其他节点加入进行了

安装和实例化链码

hyperledger fabric技术交流群